

Prerequisites
Things you need to know are:
- Familiar with React Native elementary setup, if not get started here , You can also check React Native awesome documentation here.
- Basic understanding of Hooks, if not get started here.
- Little or no knowledge of Cloudinary.
Tools Required ⚒️
- Node >= v13.0.0.
- React >= v16.9.0.
- React Native CLI >= v0.61.5.
- Android Studio, VSCode.
- I will be using VSCode, You can download here.
- If you are using VSCode, I use Lights Out theme by Nedy, Lovely theme.
- Cloudinary Dashboard. You can sign up here, If you do not have an account.
Introduction
In this article, we will be uploading an image from a mobile camera or gallery collection to Cloudinary using React Native, We will be using hooks to manage state to display the image after it is uploaded.
Cloudinary is an end-to-end image and video management solution for websites and mobile apps, covering everything from image and video uploads, storage, manipulations, optimizations to delivery, It provides a secure and comprehensive API for easily uploading media files from server-side code, directly from the browser or from a mobile application.
Using Cloudinary's upload capabilities, you can upload media assets in bulk with a variety of options for customizing how they will be uploaded, including naming, whether to apply manually specified or automatically generated tags and metadata, whether to apply incoming transformations or other AI-based analysis of the uploaded assets, and more.
We can look at Cloudinary as our cloud storage for media files (images, videos, PDFs, text documents, GIFs), But in this article we will be working with only images.
Overview on what we are building
We are building a React Native app that takes an image from a device, stores it on Cloudinary and then renders it to the screen.

Let’s get started 😊
We have a boilerplate code, which will save us time in creating a React Native project and also setting up our screen styles, you can clone the repo here.
Setting up Image Picker ⚙️
- Let’s install React Native Image Picker :
yarn add react-native-image-picker
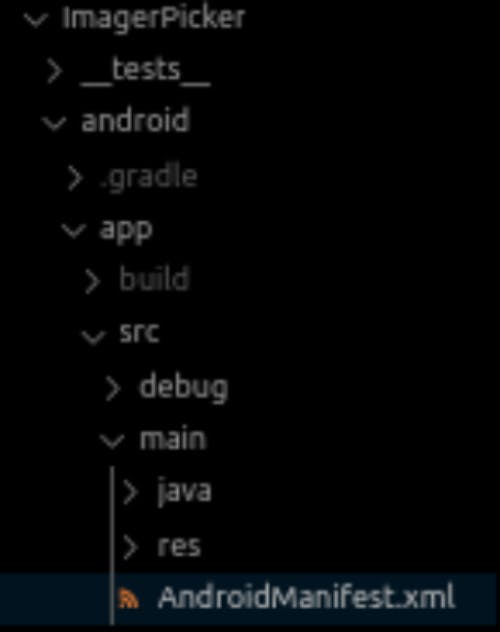
- We will have to give the app some permissions to enable camera and storage rights. We will add those permissions in the AndroidManifest.xml located in android/app/main/AndroidManifest.xml.
- We will import ImagePicker from 'react-native-image-picker' in App.js
- Now we have to fix up our Image Picker, ImagePicker.showImagePicker will be needing two arguments
- First we have options which is an object for customizing the image picker, it can be omitted for a default options.
- Our second argument is a callback that sends an object in response.
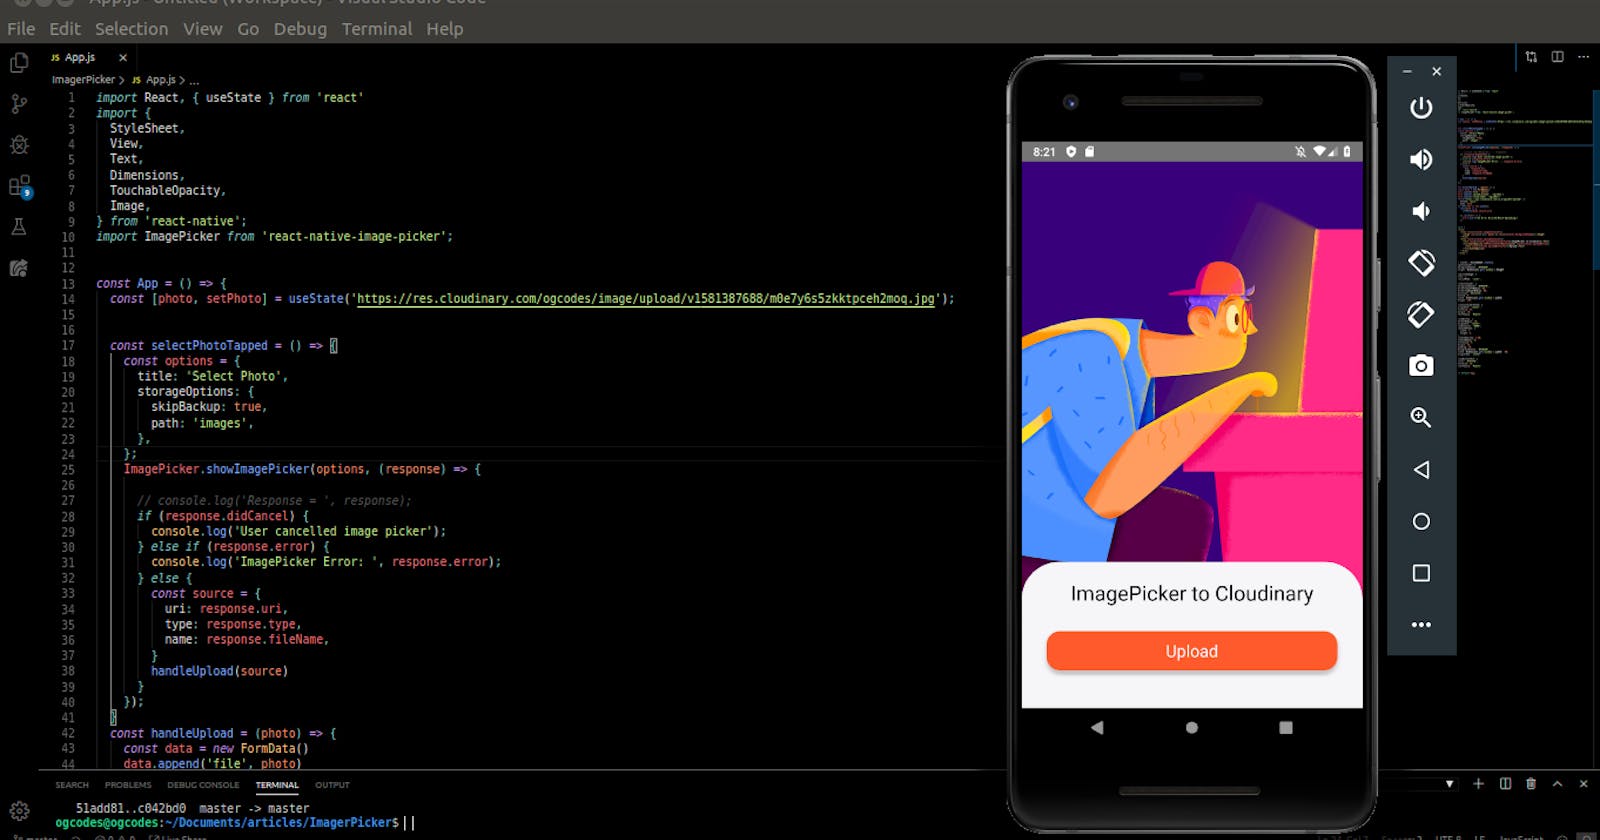
- Let’s write some code in the App.js :
- From our boilerplate code we should have this :
This is some starter code that will cover UI layout and styles.
- Now we will add our Image Picker to the code :
From the code above we have a function called selectPhotoTapped which bodies all our Image Picker code.
In selectPhotoTapped function we have an object called options as explained earlier, it’s an object for customizing the image picker.
Moving forward we have to access the method showImagePicker from ImagePicker, showImagePicker displays the image picker and has two arguments, options and a response object.
- After understanding how our image picker works, let’s see it work by calling the selectPhotoTapped function which will be triggered by a TouchableOpacity press event.
We will be logging out a response from both line 12 and source from line 23.
Demonstration :

Output :

The data between the red lines is what we are interested in, The first log response is the entire response from Image Picker, The second log is specific data that we will be using later in future of this article it consists of three properties :
- name
- type
- uri
- Now we are ready for our cloudinary setup. 🎉 🎉 🎉
Setting up Cloudinary ⚙️
Just to let us know, uploading to Cloudinary is done over HTTPS using a secure protocol based on your account's cloud_name, api_key and api_secret parameters, or using an unsigned upload without an authentication signature. When using Cloudinary's SDKs, The three security parameters are generally configured globally.
- To begin our setup we will need to create an account using this link if we do not have one already.
- After the Signup or Sign in process, we should see our dashboard like so :

- We click on the settings icon at the right section of the top navbar, Then we will navigate to the upload tab we should see :

- We scroll down to where we will find Upload presets, and click Add new preset :

- I recommend changing Upload preset name to a custom name, and also setting Signing Mode to unsigned, this will allow us to upload to Cloudinary without an authentication signature and then save it like so :

- Now we are done with the Cloudinary settings, Our next step, We need to create a FormData so we can upload our image and cloudinary presets.
- First, we start by setting the state for the photo, In this article, we will be using hooks.
- Next up we are creating our Cloudinary function, we will first create a FormData and append our image file, Cloudinary presets and cloud name.
- Next up we have to upload our data to our Cloudinary API using a fetch method. We can get our base API and cloud name here :

- Uploading our data to Cloudinary, we will be making a POST request to our base API like so :
- From the code above we did a POST request to our base API and from the response data we will be making use of only secure_url and we updated the state of our photo.
- Now we have our function set up, In the selectPhotoTapped function, we will be calling cloudinaryUpload and passing our image data as an argument.
Conclusion
Finally we can take a look at our entire code and have a rundown on the steps.
- We set up our UI layout.
- We installed Image Picker from React Native.
- We set up our Image Picker and tested it.
- We set up our Cloudinary presets.
- We fix up our Cloudinary in our code by sending a request to our base API.
- We got the response and use it to update our image display.
Here is the complete code, feel free to send a pull request if you like to add something to what we have.
Thanks for reading ❤️
Hope this helps, you can tweet at @Godswillokokon if you have any questions.